

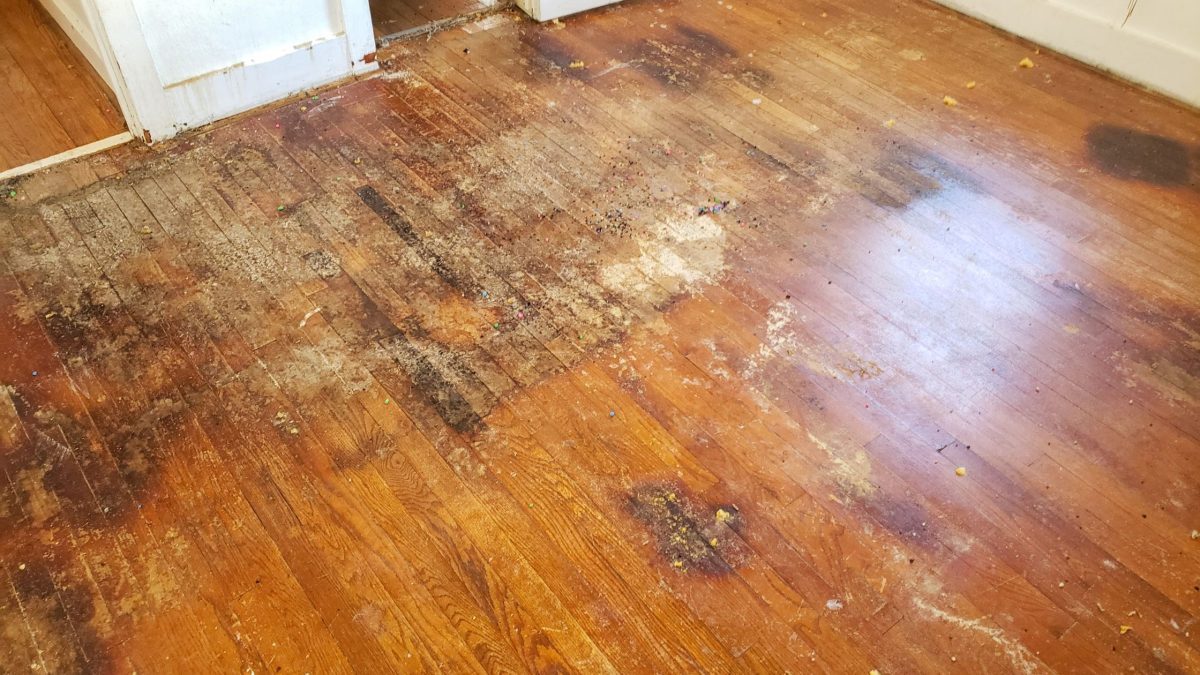
So you woke up this morning to find your beautiful wood floors warped and waterlogged, huh? Whether it was a burst pipe, an overflowing tub, or a surprise storm blowing in an open window, water damage is no joke. You don’t know how to fix water-damaged wood floors. But before you panic and call the flooring contractors, take a deep breath. In many cases, you can salvage and restore water-damaged wood floors yourself. It will require some elbow grease, but with some basic equipment and the right techniques, You can restore the beauty of your wood floors. Over the next few steps, I will walk you through everything you need to know to assess the damage, make repairs, and restore your wood floors after water damage. With patience and persistence, you’ll be enjoying your wood floors again. Let’s get started!
How to Fix Water-Damaged Wood Floors
How to Dry Out the Water-Damaged Wood Floor
First, soak up as much water from the wood floor as possible. Use old towels, mops, and wet/dry vacuums to blot and vacuum the standing water. Then, place fans and dehumidifiers around the area to help the wood dry out. Keep them running continuously until the floor is completely dry.
Once you have dried the surface, it is time to check for water damage underneath. Look for dark stains, warped or buckled wood, and soft or spongy spots. These areas may need repairs or replacement. You can use a moisture meter to check that the subfloor and any wood under the flooring are dry before closing the floor.
How to Clean Hardwood Floors for a Polished Look
If water seeped into the space below the flooring, you must also dry that out. Drill 3/8-inch holes every few feet, then blow hot air into the holes using a hair dryer. The heat will dry out and ventilate the area. You can also place desiccants, like silica gel packets, beneath the flooring to help absorb moisture.
After drying the wood, evaluate the condition of your flooring and make any necessary repairs or replacements. Once everything is dry and any damage has been addressed, you can reinstall quarter-round trim pieces or shoe molding around the room’s edges.
The final step is to prevent future water damage. Apply a waterproof sealant or wood floor protective coating as an extra barrier. Be sure to immediately wipe up spills and splashes and address any leaks or plumbing issues directly. With some patience and TLC, you can get your wood floors back in shape after water damage.
Best way to clean cabinets before painting
How to Fix Water-Damaged Wood Floors
How to Fix Swollen or Buckled Wood Planks
Suppose your wood floors have water damage, do not panic. You can take a few steps to fix swollen or buckled planks and get your floors back in shape.
First, soak up any standing water with towels as soon as possible. Then use a dehumidifier or fans to dry out the area thoroughly. This can take days or even weeks for severe damage. The key is patience and keeping the area well-ventilated.
Once the wood is dry, you may need to sand down any raised edges or uneven areas. An electric hand planer, belt sander, orbital sander for minor warping will do the trick. Start with a coarser grit and work to fine-grit sandpaper for smooth results.
You’ll need to replace planks if they are severely damaged or no longer level with the surrounding wood. Use a pry bar and hammer to carefully remove the old planks without damaging nearby wood. Measure the open space and purchase replacement planks that match your flooring as closely as possible.
Install the new planks by gluing them in place or nailing them at an angle through the tongues. Add trim pieces to cover the edges for a seamless appearance. You may need to re-stain or re-refinish patched areas to blend in the new wood.
You can fix water-damaged wood floors with some time and elbow grease. Stay patient through drying, sand and replace planks as needed, and re-refinish professional-looking results. Your wood floors will be back in pristine shape before you know it!
Vinegar to Clean Hardwood Floors
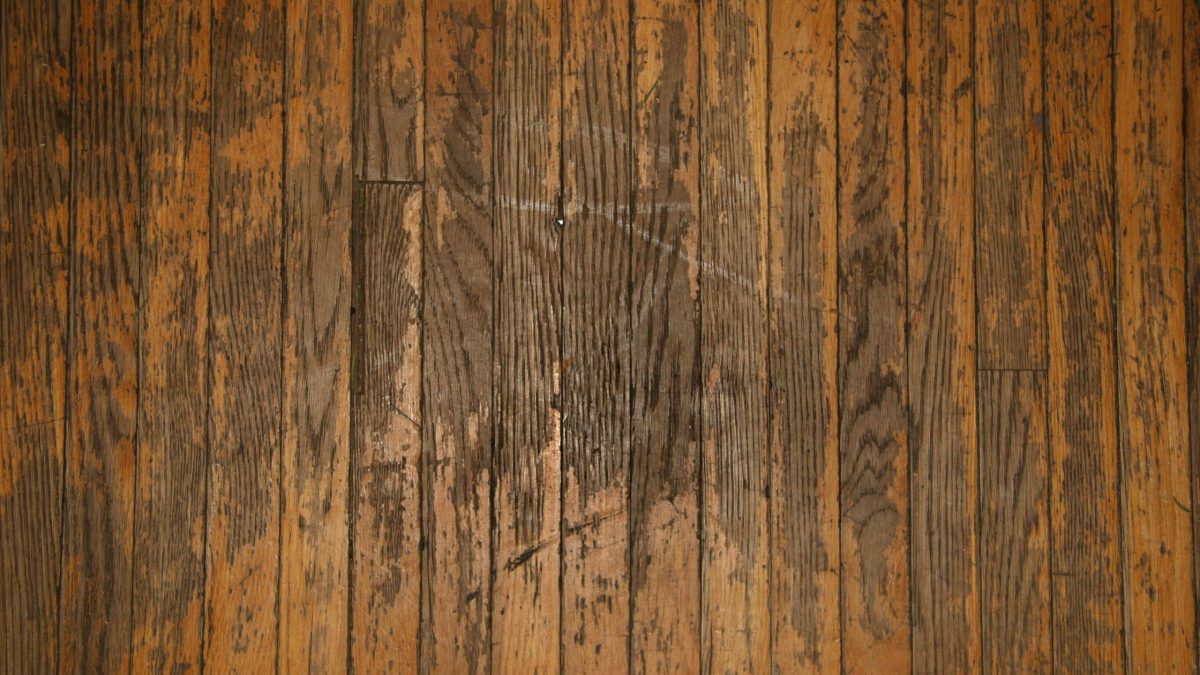
How to Sand Away Water Stains on Wood Floors
Once the water damage has been repaired and the floor has dried completely, you’ll want to sand out any remaining water stains on your wood floors. This will restore an even tone and smooth finish.
1. Rent an electric sander. For water damage, an orbital sander or sheet sander will work well. They are easy to maneuver and do an adequate job smoothing wood.
2. Start with coarse grit sandpaper. For water stains, begin with 80 to 100-grit sandpaper. This rougher grit will quickly sand out the damaged area. Slowly progress to finer grits like 120, 150, and 220 to blend the area with the surrounding floor.
3. Vacuum and wipe away dust. Use the vacuum hose or tack cloth to remove sawdust from the floor. This allows you to see your progress and ensures an even sanding job.
4. Sand in the direction of the grain using overlapping passes. Work slowly in smooth, even passes with the sander. Blend the sanded area with the surrounding floor using finer grits and gradual, overlapping sanding.
5. Repeat with progressively finer sandpaper until the stain disappears and the floor is smooth. It may take a few rounds of sanding to entirely eliminate a water stain, especially if it’s deeply penetrated the wood. Patience and gradual progress to finer grits are key.
6. Buff the area to restore shine. Once sanded, the area may appear dull. Use a buffing compound, wax, or floor polish to restore the sheen and protect the wood. Recoat the entire floor for an even finish.
With some elbow grease, you can sand out water stains and restore your wood floors to like-new condition. Take your time and be thorough for the best results. Your floors will be back to beautiful in no time!
How to Apply a Wood Floor Repair Finish
Once the wood floor has dried completely, applying a finish to repair any damage and protect the wood is time. An oil-based finish works best for water damage since it penetrates deep into the wood. Here are the steps to apply the finish:
Lightly sand the floor.
Lightly sand the area with fine-grit sandpaper (around 220 grit) to rough the surface so the finish adheres better. Wipe away dust with a tack cloth.
Apply the first coat.
Apply the first oil-based floor finish or polyurethane coat with a brush, roller, or floor finishing pad. Ensure you cover the floor evenly and avoid drips or pools of finish. Let it dry as directed by the product instructions.
Lightly sand and wipe again.
Once dry, do another light sanding with fine-grit sandpaper and wipe the floor with a tack cloth to remove dust before applying another coat.
Apply additional coats
For the best protection, you’ll want to apply at least two to three coats of finish, waiting for each coat to dry completely between applications. The final coat should leave the floor with a smooth, glossy finish.
Avoid walking on the floor.
After applying the final coat, do not walk on the floor for at least 24-48 hours to avoid imprinting or denting the fresh finish. Put down painter’s tape or caution tape to block access.
Add floor protectors
Attach felt pads, casters, or floor protectors to the bottoms of furniture to avoid scratching the floor. Place walk-off mats at entrances to prevent dirt and grit from damaging the floor.
You can achieve professional-looking results restoring a water-damaged wood floor with some patience. The key is taking time with each step and allowing adequate dry time between sanding, coating, and recoating. In a few days, your floor will be ready to enjoy again!
Best way to clean transmission case – A Step-by-Step Guide
Tips for Preventing Future Water Damage
To prevent future water damage to your wood floors, there are a few tips you should keep in mind:
Control excess moisture
The leading cause of water damage to wood floors is excess moisture. Be on the lookout for any sources of standing water or high humidity in the home, like leaky pipes, appliances that produce steam (humidifiers, vaporizers), or areas with poor ventilation. Fix any leaks immediately and ventilate and dehumidify when needed.
Use furniture pads
Adding felt pads to the bottom of furniture like chairs, tables, and couches on your wood floors can help prevent scratches and dents. These pads distribute the weight and to avoid damage to the floor. Be sure to check the places regularly and replace them if they become worn.
Wipe up spills immediately.
Immediately wipe up spills on your wood floors, whether it is a drink, a pet accident, or some other liquid. Don’t let excess moisture sit, as this can damage water, warp, or discoloration. Have cleaning supplies on hand to deal with spills quickly.
Avoid excess heat
While wood floors can handle normal fluctuations in temperature, extreme or direct heat should be avoided. Don’t place space heaters, wood stoves, ovens, or other heat sources directly on or near wood floors. The heat can cause damage to the flooring.
Add furniture glides
Add glides or sliders underneath to make it easier to move for larger furniture like dressers, hutches, pianos, or cabinets. This prevents dragging the furniture across the floor, which can lead to scratches, dents, and damage. The glides will allow the furniture to slide smoothly when needed.
RefiRefinishreseal when needed
Over time, the protective finish or sealant on wood floors will wear down, leaving the floor prone to water and other damage. Have your floors inspected regularly and resealed or refired finished a few years to maintain protection. Resealing or refiring finishing floors before significant water damage occurs is the best way to prevent costly repairs.
Conclusion
So there you have it, a step-by-step process for reviving your water-damaged wood floors and returning them to their former glory. While it may seem like an overwhelming project, you’ll be dancing on your restored floors in no time by taking it one step at a time. Start by mitigating any active leaks or standing water, then assess the level of damage to determine if DIY is the way to go or if calling in a pro is needed. Either way, with some patience and elbow grease, your wood floors will again be your space’s focal point. Stay committed to the process; before you know it, you’ll have wood floors to be proud of for years. You’ve got this! Now turn on some tunes, roll up your sleeves, and get ready to sand, stain, and seal your way to wood floor bliss.
1 thought on “How to Fix Water Damaged Wood Floors: A Step-by-Step Guide”